How to build a wood oven in a pizzeria or in the garden
of Antonio Ricchezza
Are you thinking of building a wood-fired oven in a Pizzeria or in your garden? The idea of doing it torments you but you are afraid of making a mistake and therefore prefer to rely on a specialized company to buy one ready for use.
Believe me, it is not at all difficult to build a wood oven, it just takes a lot of patience and certainly some time, as it is not your job. I assure you that you can too.
In the next paragraphs, I will explain step by step and in the smallest details how to build your own DIY wood oven. I assure you that at the end of this reading, you will immediately start looking for the material to buy for the construction of your oven.
Are you ready? Make yourself comfortable and dedicate five minutes of your time, focusing on reading the next few lines.
The guide to building a DIY wood oven
If you want to build it in the garden, you start by making a small excavation of about ten centimeters, wide and long the size of the oven to be made. If, on the other hand, you want to build it in the Pizzeria, just lift the tiles from the floor and build a 10 cm concrete screed.
Once the excavation has been completed, insert a metal mesh inside, the ones that bricklayers use when they make a concrete screed and that’s exactly what you need to do to support the weight of the finished oven and to be able to glue the bricks on top.
With wooden planks, create a frame around the excavation you made earlier and then make a cast of concrete, sand and rubble and using a spatula make it smooth.
At this point, you need to wait a few days for the concrete base to dry well. Then, you can start raising the load-bearing walls using concrete bricks (the gray ones with holes) and a good glue. I remind you to always use a level and a piece of string so that the finished oven is perfect.
The correct height of the load-bearing walls is about three bricks of 50 cm each. Once the positioning of the concrete bricks is finished, let it dry and then start placing the tiles on the entire surface, always using the glue.
The second concrete pour
With wooden planks, build a frame around the planks of about 10 cm in height. Inside, insert a metal mesh of those used in construction and make a cast of concrete, sand and rubble again and smooth everything. As soon as everything has dried, you can proceed with the construction of the hob.
First, you need to draw a circle on the surface that will be the inside of the oven. To make the circle, use a nail that is at least 5 cm high, a piece of string and a pencil.
You have to tie one end of the string to the nail and fix it in the center of the oven surface with a hammer. The other end of the string instead, you have to tie it to a pencil with which you begin to form a circle by spinning it with your hands.
The DIY wood oven hob
After making the circle (the internal base of the oven), you can start placing the refractory bricks using a high temperature resistant glue. Another tool you need to make the hob is the flex with disc suitable for cutting concrete. Used to cut bricks to size.
Once the base of the circle is finished, place more red bricks around the circle, they will be used to raise the dome. Under them it is necessary to insulate with 8 cm gasbeton panels.
DIY wood oven mouth
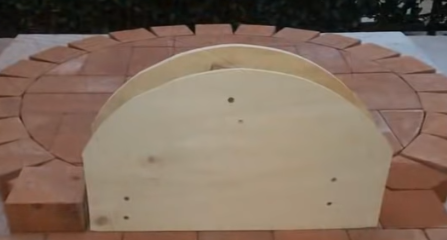
Let’s now pass to the realization of the oven mouth. To make the mouth of the wood-fired oven, you will need a sheet of plywood or plywood. Draw with a pencil the shape of the oven mouth of the measures you have previously set and finally cut out everything and place it on the red bricks. N.B. Two copies of the forms are needed.
See photo below.

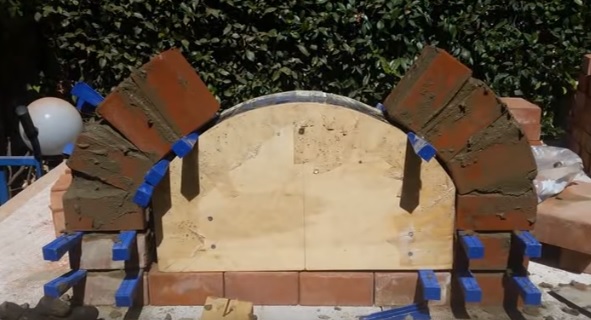
Place the shapes at the base of the ground, now you can proceed to build the oven mouth with bricks. I recommend always using glue for high temperatures.

Once the glue is dry, you can extract the wooden panels that you used as a mold.
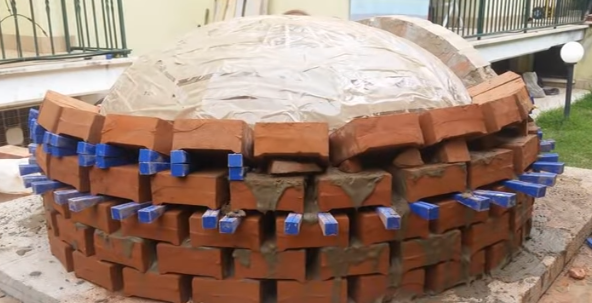
Let’s now pass to the construction of the dome of the wood oven. Also for the dome, you need some wooden panels cut to the size you are interested in and place everything immediately behind the oven mouth. Now, start gluing the fire bricks around the mold starting from the ground.
The bricks are not to be glued whole, they are divided in two.

The closure of the roof of the dome of the wood-burning oven must be made with scraps of bricks. Once the construction of the dome is finished, let it dry for a few days and immediately afterwards, start plastering everything with refractory mortar.
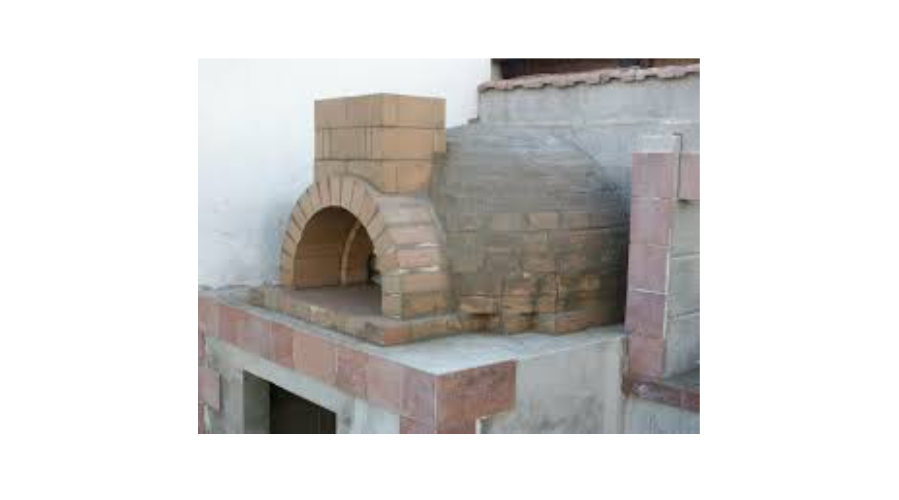
Leave everything to dry well and move on to the construction of the external mouth of the wood oven. Always use the mold you made with the multilayer sheet and raise the bricks around.
Remember that between the mouth of the oven and the dome, there must be a space to insert the smoke suction pipe.
Finally, the dome of the wood-burning oven must be covered with a sheet of ceramic fiber with a thickness of 5 cm and finally make the insulation coat.
To finish the DIY wood oven, place concrete bricks on the sides of the oven mouth, they will serve as a closing structure and also around the dome. After building the retaining wall of the dome with gray bricks, pour the expanded clay inside almost to the edges of the retaining bricks.
To finish, insert a wire mesh on top and cover everything with refractory mortar.
Lighting the wood-burning oven do it yourself
Always respect the drying times of the material.
Once everything is finished, the time has finally come to try your own wood-burning oven built with your own hands. Light some wood inside and don’t get to high temperatures immediately. It has to be brought to 400 ° C slowly, day after day.
The most important thing to check immediately is the draft of the chimney.
Do-it-yourself wood oven exterior cladding
Wait for the wood-fired oven to cool and then you can start coating the outside. For this stage, you can have fun as you want. It is not recommended to use paint as it would get dirty immediately and cannot be washed, at least in the parts where we use the pizza peels.
The peel of Trani, is a stone of about 2 cm thick, resistant to hot / cold temperatures and a certain charm to the oven.
At this point, the DIY wood oven is finished and you are ready to bake and take out the pizzas.
This article was produced in collaboration with Maxcer69
